Fabric mask posts are abundant right now. The novel coronavirus pandemic has everyone with a sewing machine busily making masks. Even those without sewing machines are taking up needle and thread. There’s several websites and social media groups focused on just that one thing: making fabric masks to donate to those who need them.
But what happens when you run out of elastic? Well, you can certainly use fabric ties to tie the mask on. As a matter of fact, most medical facilities have been requesting that the masks the home sewing brigades are creating be equipped with fabric ties instead of elastic ear loops. Because medical facilities do wash and sanitize the masks, the fabric ties hold up better in the wash than elastic does. That makes total sense. After all, the fabric masks are reusable, not meant to be discarded. So making sure they can withstand the heat and bleach used in the industrial laundries is crucial.
I can make fabric ties. But I have donated over 140 masks to date and the bulk of them (90%) so far, have gone to everyday citizens. A few have gone to medical professionals who requested them. My point is that the masks I have been making do not need to withstand more than the weekly laundering at home. And I really, no, I mean REALLY, like the slip-on ease of elastic for the ear loops. But, like the rest of the world, I have run out of elastic. What to do?
There have been many ideas out there for elastic alternatives. Pony tail bands are 1 alternative. I played around with that, and even bought a bunch of different ones at the dollar store so I could experiment. I didn’t like that I needed to alter the fabric pattern, use more fabric for the masks, and then risk the mask not fitting as intended because the elastic pony tail holders, while stretchy, were still rather unyielding to be used on a regular basis to go over ears. Scratch that idea for me!
But I had many hair ties from the dollar store so I kept on looking for a workaround. And last week, I came up with something that I’ve now had “field tested” by some, which I think is a good solution for various reasons: maintains the slip-on ease (no tying needed); fits snugly; one size fits most (and if it doesn’t you can easily remedy and make custom sizes); saves the ears (these don’t rest on your ears); uses readily available pony tail holders that cost pennies a piece. Ready to see the mask? Here we go!

The mask itself is the same as I was previously making. It’s just the ties that bind which are different. I was using the instructions that Deaconess put out. Here they are for your review. It’s basically 2 pieces of cotton fabric 9″ wide x 6″ high each. You sew them RST (right sides together) with the elastic sandwiched in between at the corners, turn it around, iron, topstitch all around, and while topstitching, make 3 pleats on each side and presto, 1 mask finished! I won’t provide more details than that because Deaconess has done a great job of that already, video and everything.
My Mask 2.0 (without elastic) uses 2 thin fabric ties (think summertime dresses spaghetti straps here) and they are held together with a tiny stretchie hairband. It’s that hairband that allows the mask to be pulled on, instead of tied, and also fit most. It stretches a bit to accommodate different head sizes. Umm….mine comes in a large. I’ve never been able to buy off-the-rack hats. Woe is me.
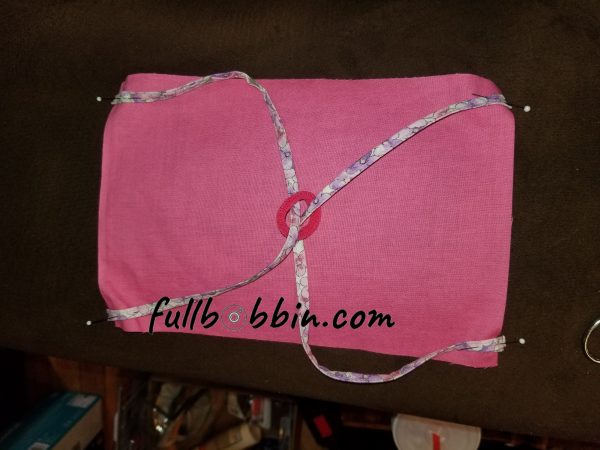
I will do a full on step-by-step tutorial of Mask 2.0 in an upcoming post and link it here. But for now, the above should be enough to get you started. The fabric straps are still sandwiched in between the 2 layers of fabric, RST, while each strap is threaded through the elastic band, before you sew it up and turn it right side out. I’m showing this step in the image below. Doing this before sewing creates 1 continuous band that just needs to be pulled over your head when wearing. No need for tying.
Easy, peasy. Apart from making a couple dozen masks this way and getting them to people who have used them, I also shared the process on a Facebook group dedicated to sewing masks and it was well received.
Until next time, keep your bobbin full and your bucket list empty!

Leave a Reply
You must be logged in to post a comment.